
KAUF Smart Plug (PLF12)
w/ Power Monitoring
This classic home automation device can be used to switch on and off a device that plugs into a standard U.S. 120-volt wall outlet. Common usages include lamps, box fans, and Christmas lights. Power monitoring can let you know whether the plugged in device is running and how much electricity is being used.
- Runs ESPHome out of the box for 100% local control without flashing, soldering, or editing YAML.
- Connects natively to Home Assistant without going through a cloud connection or requiring a third-party App to setup or connect the plug.
- Reprogrammable with any ESP8266 compatible firmware if desired.
We recommend our GitHub readme for a description of all the configuration entities and more important information about our smart plug!
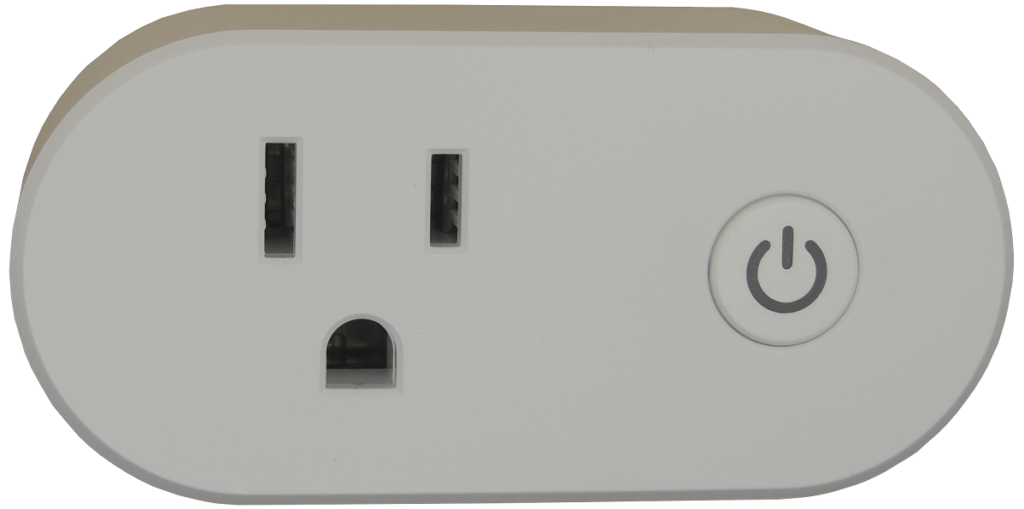
Hardware Version Note
This page is for the new plug model, PLF12. The PLF12 has its plug on the left side and button on the right side. The LEDs are within the button. Please ensure that you have the right plug before downloading updates from this page, as the updates on this page are not compatible with the PLF10 plug.
For information on our old plug, see the KAUF Smart Plug (PLF10) page.
Downloads
Visit our GitHub page for the plug for more information and downloads.
If you want to update the plug through the built-in web interface, download the latest bin.gz file from our github releases page.
Adding the KAUF Smart Plug to Home Assistant
We recommend that you import the plug into the ESPHome dashboard prior to adding to Home Assistant. See the video below under Importing to ESPHome Dashboard. You would follow the ESPHome dashboard import directions after connecting the bulb to WiFi and before adding to Home Assistant. This is step 4 in the written directions below, but not mentioned in the video.
The KAUF Smart Plug comes programmed with a firmware that was made using ESPHome. The ESPHome firmware currently only works using Home Assistant as a hub. Home Assistant comes with a native API that is used to easily add and configure ESPHome based devices.
Please visit https://www.home-assistant.io/getting-started/ if you still need to get Home Assistant set up. The easiest way is to purchase a Raspberry Pi kit, flash the appropriate Home Assistant image onto an SD card, and then boot the Raspberry Pi from the SD card. Feel free to contact us if you still need further help.
Once you have Home Assistant running, complete the following steps to add a KAUF Smart Plug.
Step 1: Plug in a KAUF Smart Plug. The red LED will start blinking relatively soon after the device is plugged into a wall outlet. In general, the red light blinking indicates that the plug cannot connect to Wi-Fi (expected on a new plug), or that the plug cannot connect to Home Assistant.
Step 2: Connect to the KAUF Smart Plug’s Wi-Fi Hotspot. When a KAUF Smart Plug is unable to connect to a Wi-Fi network, the plug will wait 15 seconds and then create its own Wi-Fi hotspot. The Wi-Fi hotspot SSID will be “Kauf Plug Hotspot”.
Step 3: Enter Wi-Fi credentials into the web interface. When you connect to the KAUF Smart Plug’s hotspot, you should be prompted by your device to sign-in to the Wi-Fi network. The sign-in page will list Wi-Fi networks the KAUF Smart Plug found, and allow entry of any SSID and password used to connect to your local Wi-Fi network. Enter your network credentials and click save. The KAUF Smart Plug will reboot and connect to your Wi-Fi network.
Step 4 (Optional): Add the KAUF Smart Plug in ESPHome Dashboard. The plug should be automatically detected by the ESPHome dashboard if fully updated. From the ESPHome dashboard, the process is pretty self explanatory. We recommend that you change the name and set a friendly_name substitution in the yaml file. See the section below for a video walkthrough.
Step 5: Add the KAUF Smart Plug in Home Assistant. Shortly after your KAUF Smart Plug reboots, Home Assistant will give you a notification that a new device was discovered. Follow the notification to go to the Integrations page, and you will see the detected KAUF Smart Plug in a blue box that says Discovered. Click the “Configure” button to complete setup.
Step 6: Rename the device and entities. If you didn’t add the plug to the ESPHome dashboard and rename there, you will want to rename the device and any entities you intent to use in Home Assistant. From the Home Assistant Integrations page, accessed through the configuration menu, the KAUF Smart Plug can now be found within the ESPHome card, initially named “Kauf Plug”. Selecting the KAUF Smart Plug from the list of ESPHome devices will allow you to rename the device to something more descriptive and useful. Follow the link that says “6 entities” to access a list of the available entities. The switch entity will be the entity that is used to turn the KAUF Smart Plug on and off. Several sensor entities will be available to indicate detected voltage, current, and power usage. Another sensor entity will be a text sensor that provides the plug’s IP address on your network. Clicking the individual entities will open up a window allowing the entity names and IDs to be changed to something more descriptive and useful.
Importing to ESPHome Dashboard
Firmware version 1.83 implements ESPHome’s dashboard import feature, so if you update your plugs they will be automatically detected by the ESPHome dashboard. The following video explains the process.
Hardware Information
The KAUF Smart Plug includes an ESP8266 chip and uses the following pins:
- GPIO 1 – Red LED. The red LED will be lit when GPIO1 is output low, and off when GPIO1 is output high.
- GPIO 12 – Blue LED. The blue LED will be lit when GPIO12 is output low, and off when GPIO12 is output high.
- GPIO 13 – Relay output. When the GPIO13 output is high, the relay connects input power to output power. When GPIO13 is low, the relay opens and power is disconnected.
- GPIO 4 – CF pin for power monitoring.
- GPIO 14 – SEL pin for power monitoring.
- GPIO 3 – Button input. The input is shorted to ground when the button is pressed, and is pulled up to 3.3v by a resistor when the button is not being pressed. When using the button input, the ESP8266 built-in pull-up resistor needs to be enabled. If you flash the KAUF Smart Plug to a different firmware and are getting strange results, you may not have enabled the pull-up resistor.
- GPIO 5 – CF1 pin for power monitoring.
The KAUF Smart Plug includes a relay rated for a 15-amp resistive load. The relay is the physical component that moves to connect or disconnect the input 120v power to the output of the KAUF Smart Plug. Resistive load means things like lights and household fans. Small household appliances will typically be resistive loads or have a small enough capacitive or inductive load to work fine with the KAUF Smart Plug. This plug is not appropriate for large capacitive or inductive loads, which includes things like water and air pumps.
Flashing Tasmota
To convert the KAUF Smart Plug to Tasmota, simply download tasmota.bin.gz, browse to the plug’s IP address in a web browser, and use the web page to flash.
Important Note: Do not have anything plugged into the PLF12 when Tasmota is flashed. The relay output on the PLF12 is the same pin as the default LED output for Tasmota. When Tasmota is first installed, the relay will turn on and off every second or so, because Tasmota thinks it is blinking a light.
The recommended Tasmota template is:
{"NAME":"Kauf Plug","GPIO":[0,320,0,32,2720,2656,0,0,321,224,2624,0,0,0],"FLAG":0,"BASE":18}